
Choosing between snap-in denture attachments can feel overwhelming when you’re exploring options to replace missing teeth.
Both locator and bar systems secure your dentures to dental implants, but they work in different ways and offer distinct benefits depending on your needs.
Locator attachments demonstrate superior clinical performance with lower complication rates and reduced maintenance compared to ball attachments, while bar systems distribute forces more evenly across multiple implants for enhanced stability.
The choice between these two systems depends on factors like your bone structure, budget, and how much vertical space you have in your mouth.
Understanding the differences between snap in dentures attachment types helps you make an informed decision about which option gives you the best combination of comfort, stability, and long-term value.
This guide breaks down how each system works, what you can expect during treatment, and which situations favor one approach over the other.
Key Takeaways
- Locator attachments typically require less maintenance and fewer office visits than bar systems over time
- Bar systems work better when you have flat ridges or severe bite issues that need extra stability
- Your choice depends on your specific mouth anatomy, budget, and how much vertical space is available
What Are Snap-In Dentures and Attachment Systems?
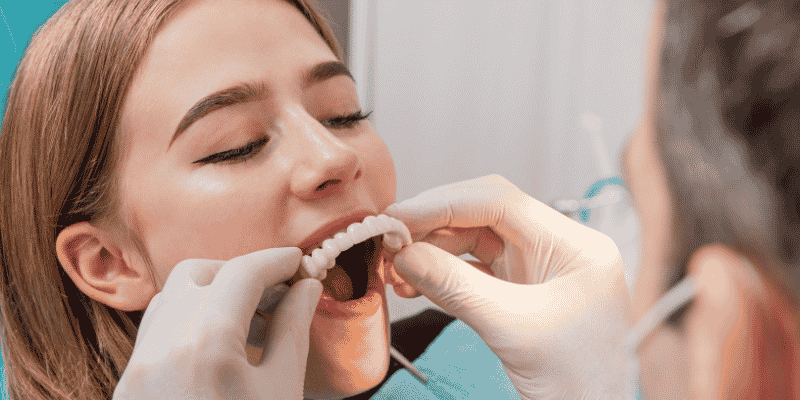
Snap-in dentures attach to dental implants placed in your jawbone through specialized connector pieces called overdenture attachments.
These attachments create a secure snap-fit connection that keeps your dentures stable while still letting you remove them for cleaning.
Overview of Snap-In Dentures
Snap-in dentures are removable teeth replacements that connect to dental implants for added stability.
Unlike traditional dentures that sit on your gums and rely on suction or adhesive, implant-supported dentures use a mechanical attachment system to lock into place.
You’ll typically need 2-4 dental implants depending on which arch you’re treating. Your lower jaw usually needs just two implants because the bone is denser.
Your upper jaw typically requires four implants since the bone is softer and covers more area.
The implants act as anchors that hold your denture firmly against your gums. You can snap the denture on in the morning and remove it at night.
This gives you better stability than regular dentures without the permanent commitment of fixed implants.
Implant-Supported Denture Basics
Your implant-supported denture has three main parts working together. First are the titanium implants surgically placed into your jawbone.
These posts fuse with your bone over 3-6 months through a process called osseointegration.
Second are the attachment components that connect to these implants above your gum line. The attachment system allows your denture to snap into place while maintaining a secure connection during wear.
Third is the denture itself, which looks like a traditional denture but has special housings built into the base for the attachments.
When you insert your overdenture, you position it over the attachments and press down firmly. You’ll feel and hear a snap as the pieces lock together. To remove it, you apply upward pressure to release the connection.
Role of Overdenture Attachments
Overdenture attachments are the connector pieces that create the snap-fit bond between your implants and denture.
They come in different designs, with locator and bar systems being the two most common types you’ll encounter.
The attachments have two parts. The male component attaches to your implant and sits above your gum tissue. The female component embeds inside your denture base.
These pieces fit together precisely to hold your denture in place.
Locator attachments can wear out after months or years of use, which means the rubber or nylon parts need periodic replacement. This is normal maintenance, not a system failure.
Your dentist can replace these worn components during a quick office visit to restore the tight snap you had originally.
Understanding Locator Attachments
Locator attachments use a dual-component design where metal abutments screw into your implants and nylon inserts fit inside your denture to create a secure snap-fit connection.
The system’s self-aligning design allows the denture to seat properly even when implants aren’t perfectly parallel.
How Locator Attachments Work
The locator attachment system uses a male-female connection between your implants and denture. Your dentist first places metal locator abutments onto the dental implants in your jaw.
These abutments are gold-colored posts that stick up through your gum tissue.
Inside your denture, your dentist creates small housings that hold nylon inserts. These inserts are the female part of the attachment.
When you place your denture in your mouth, the nylon inserts snap onto the abutments with an audible click.
The self-aligning design treats up to 40 degrees of angle correction between implants. This means your implants don’t need to be perfectly parallel for the system to work.
The locator attachments pivot slightly to accommodate different implant angles.
Key Benefits of the Locator System
Locator denture systems provide high patient satisfaction because you can smile, eat, and speak without worrying that your denture might slip. The attachment systems keep your denture stable during daily activities.
The locator system requires less vertical space than bar attachments. This makes it a good option if you have limited room between your gums and opposing teeth.
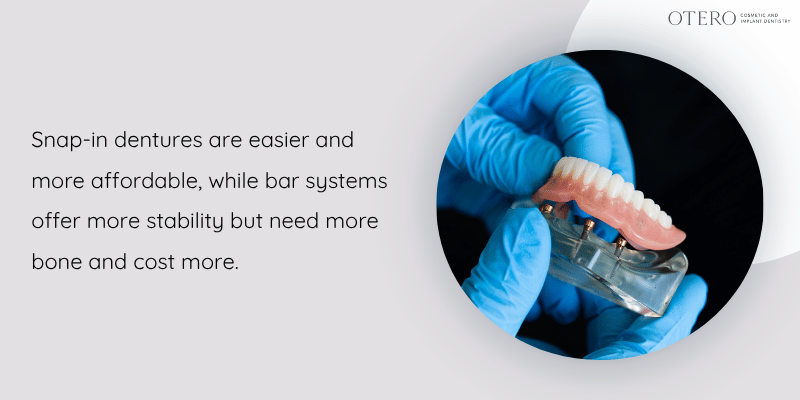
Cost is another advantage. Locator attachments are often cheaper than bar systems because they require fewer components and less complex fabrication.
Parts and Components of Locator Attachments
Your locator system includes several key parts:
Locator Abutments: Metal posts that screw directly into your dental implants. These stay permanently in place.
Nylon Inserts: Replaceable pieces that fit inside metal housings in your denture. Different colored inserts provide varying retention strengths to match your needs.
Metal Housings: Small caps embedded in your denture that hold the nylon inserts securely.
The nylon inserts wear over time from daily use. You’ll need to replace them periodically to maintain proper retention.
Your dentist can swap out worn inserts during a quick office visit without removing the abutments from your implants.
Bar Attachment Systems Explained
Bar attachment systems connect multiple implants with a metal framework that clips into your overdenture, creating a stable and even distribution of force across all implants.
How Bar Attachments Support Overdentures
A bar attachment works by connecting two or more dental implants with a metal bar that sits along your gum line.
Your overdenture fits over this bar and locks into place using clips or special attachments built into the denture base.
The bar creates a unified structure that spreads the force from chewing evenly across all your implants. This is different from individual attachments, where each implant works independently.
Your denture rests on both the soft tissue of your gums and the bar itself. The attachments act as a lock to prevent your denture from dislodging, but they don’t support the entire weight of the prosthesis.
The bar can extend past your ridge to prevent any unwanted movement when you bite into foods.
Dolder Bar and Other Bar Types
Several types of bars work with different attachment systems:
- Hader bar – Uses clips for retention
- Dolder bar – Engages with precision attachments
- Locator bar – Combines a bar framework with Locator attachments for dual retention
- ERA bar – Features ERA attachments with nylon inserts
The LOCATOR Bar Attachment System offers a self-aligning denture cap that makes it easier to seat your overdenture accurately.
You can have your bar made from cast alloy or milled titanium depending on your specific needs.
Each bar type provides different levels of retention and requires different maintenance approaches.
Advantages and Considerations of Bar Systems
Bar systems offer several benefits for your overdenture. They eliminate the discomfort of conventional dentures that rest only on your gums, providing an irritation-free experience.
The bar splints your implants together, which can be especially helpful if you have a severe overjet or unfavorable bite alignment.
When you bite into an apple or other firm foods, the bar keeps your denture stable without placing stress on the retentive elements.
Bar-overdentures offer the benefit of splinting implants, which helps distribute forces more evenly. This is particularly useful if you have a flat ridge with minimal tissue support.
Bar systems do require more vertical space in your mouth compared to direct attachments. They also typically cost more than simple stud-type attachment systems.
Your dentist needs adequate space between your gums and opposing teeth to accommodate the bar and clips.
Ready for a more secure smile? Book your consultation now and explore your snap-in denture options.
Locator vs Bar Systems: Head-to-Head Comparison
Locator and bar systems differ significantly in how they hold your dentures, affect your bite strength, and require maintenance. The right choice depends on your jaw shape, bone quality, and lifestyle needs.
Retention, Stability, and Bite Force
Locator attachments provide strong retention through individual connection points on each implant. You can adjust the holding strength by changing the nylon inserts, which come in different resistance levels.
Bar systems connect multiple implants together with a metal framework. This creates a wider distribution of force between dental implants, which can improve stability when you bite down.
Research shows that Locator attachments maintain high retention and stability even after repeated use.
Both systems significantly improve your bite force compared to traditional complete dentures that rely only on tissue support.
Key differences:
- Locators: Individual attachment points, adjustable retention
- Bar systems: Connected framework, enhanced lateral stability
Comfort and Maintenance Differences
Locator systems typically feel more natural because they’re smaller and less bulky. The attachments sit flush against your gums, giving you more tongue space.
Bar systems extend across your implants, which can take some getting used to. However, they prevent your denture from rocking when you bite into hard foods from the front.
For maintenance, Locators require periodic replacement of the nylon inserts as they wear out. You’ll need to visit your dentist when the retention weakens, which happens every 12 to 24 months for most patients.
Bars need less frequent part replacement but require more thorough cleaning. Food can get trapped under the bar, so you’ll need to remove your denture daily and clean around the framework carefully.
Suitability for Different Jaw Shapes and Bone Levels
Your jaw shape plays a major role in which system works best. If you have a flat ridge with poor tissue support, a bar system often performs better because it acts as a more fixed prosthesis.
Locators work well when you have good remaining bone and a well-formed ridge. For a lower denture with ideal ridge form, two Locator attachments can provide excellent retention.
Bone quality considerations:
- Good bone: Either system works, Locators often preferred for simplicity
- Limited bone: Bars provide better force distribution
- Flat ridge: Bars prevent rocking and movement
For upper dentures, your bite relationship matters too. If you have a severe overjet, bars extend past the ridge to prevent your denture from sliding when you bite into something like an apple.
Longevity and Replacement Needs
Locator nylon inserts are designed as wear items that you replace regularly. This is normal and expected, not a failure of the system. The metal housings in your implants rarely need replacement.
Bar systems have clips or attachments that also wear over time, but typically less frequently than Locator inserts. The bar itself is a permanent component that should last many years with proper care.
Your implant-retained dentures will perform better long-term when you maintain proper tissue support. If your gums shrink or change shape, you’ll need a reline regardless of which attachment system you choose.
The actual implants supporting either system have similar success rates. Long-term bone changes depend more on implant placement and the number of implants than on whether you use Locators or bars.
Patient Factors, Procedure, and Treatment Planning
Choosing between locator and bar attachments depends on your specific dental anatomy, budget, and lifestyle needs. The procedure involves careful planning around implant placement, bone quality, and healing time.
Who Is a Candidate for Each System?
You’re a good candidate for snap in denture attachment if you have limited jaw bone height or want a simpler, more affordable option.
These work well when you need implant-supported overdentures with fewer complications and easier maintenance.
Bar systems suit you better if you have adequate bone volume and want maximum stability. You’ll need at least two implants placed far enough apart to accommodate the connecting bar.
If you have severe bone loss in your lower jaw, your dentist might recommend bar attachments because they distribute chewing forces more evenly across implants.
Your manual dexterity matters too. Locator attachments are easier to snap in and out yourself, making them ideal if you have arthritis or limited hand mobility.
Bar systems require more precise alignment when inserting your denture.
Budget plays a role in your treatment plan. Locator systems typically cost less upfront and need fewer dental visits for adjustments.
Implant Placement and Procedure Steps
Your implant surgery starts with detailed imaging to map your jaw bone structure. Your dentist numbs the area and creates small openings in your gum tissue to access the bone.
The implants are then placed into your jawbone at specific angles and depths. For locator systems, you typically need two to four implants in your lower jaw.
Bar systems also use two to four implants but require precise spacing to fit the connecting bar.
After implant placement, your dentist may attach healing caps and close the gum tissue. You’ll wear a temporary denture during healing.
Some patients qualify for immediate loading, where attachments are placed the same day, though this depends on your bone quality and implant stability.
The final attachments are added once healing completes. Your dentist takes impressions, fabricates your custom denture, and secures the locator caps or bar framework to your implants.
Role of Bone Grafting and Osseointegration
Osseointegration is when your jaw bone fuses with the titanium implants, creating a solid foundation. This process takes three to six months in your lower jaw.
You might need a bone graft if you lack sufficient bone volume or density. Your dentist adds bone material to build up weak areas before or during implant placement.
This extends your treatment timeline by several months but ensures long-term implant success.
Bar attachments distribute forces evenly, which helps protect your bone and implants. However, they require more initial bone volume than locator systems.
Your bone quality affects which system works best. Dense, healthy bone supports either attachment type. Softer bone may benefit from bar systems that share stress across multiple implants, reducing the load on any single implant.
Cost, Financing, and Practical Considerations
The financial commitment for snap-in dentures extends beyond the initial procedure, with attachment type, implant count, and ongoing maintenance all affecting your total investment.
Understanding these costs upfront helps you budget appropriately and choose the system that fits both your clinical needs and financial situation.
Snap-In Dentures Cost Factors
The snap-in dentures cost varies based on several key components that determine your final bill.
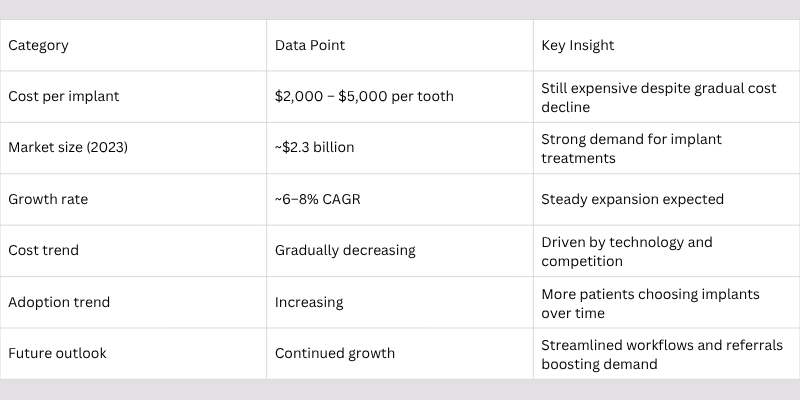
For the lower arch, expect to pay between $6,000 and $12,000, while the upper arch typically ranges from $12,000 to $20,000.
Your choice between locator and bar attachments significantly impacts price.
Locator systems generally cost $1,000 to $1,600 for components, while bar-retained systems add an extra $2,000 to $5,000 over standard ball or locator attachments due to custom fabrication requirements.
The number of implants drives a major portion of your expense. Lower arch treatments typically use two implants, while upper arch procedures require four for adequate stability.
Each additional implant adds $1,500 to $3,000 to your total cost.
Geographic location also affects pricing. Urban areas with higher operating costs typically charge more than rural practices.
The dentist’s experience level and the dental lab quality you choose further influence your final investment.
Dental Financing and Insurance
Most dental insurance plans categorize implant dentures as elective procedures and offer limited coverage. Your policy may cover the denture portion but exclude implant placement costs.
Many dental practices offer in-house financing or work with third-party healthcare credit companies. These options let you spread payments over 12 to 60 months, making the upfront cost more manageable.
Interest rates vary widely, so compare multiple financing offers before committing.
Health savings accounts (HSAs) and flexible spending accounts (FSAs) can cover snap-in denture expenses with pre-tax dollars. This provides tax savings that effectively reduce your out-of-pocket cost.
Some practices also offer package pricing that bundles implants, attachments, and the denture at a discount compared to itemized billing.
Maintenance and Aftercare Costs

Budget for ongoing expenses beyond your initial investment. Locator inserts need replacement every 12 to 24 months at $150 to $250 per visit.
Ball-and-socket O-rings require replacement every 12 to 18 months at $100 to $200 per service.
Bar-retained systems have clips that last longer, typically needing replacement every 24 to 36 months. However, the extra daily cleaning time required represents an investment of your effort rather than money.
The denture itself will need replacement every 5 to 8 years as it wears or as your mouth changes shape. This replacement costs $1,000 to $3,000 depending on materials and complexity.
Regular dental checkups every six months help catch small issues before they become expensive problems.
Frequently Asked Questions
Most people choosing snap-in dentures want to know how the two main attachment systems compare in daily use.
The differences between Locator and bar systems affect everything from how many implants you need to your cleaning routine and long-term maintenance costs.
What’s the main difference between Locator attachments and bar systems for snap-in dentures?
Locator attachments connect your denture directly to individual implants. Each implant has a small attachment that your denture snaps onto separately.
Bar systems use a metal framework that connects multiple implants together. Your denture then clips onto this bar rather than attaching to each implant individually.
The choice between these attachment methods depends on your specific mouth structure and bone condition. Bar systems generally cost more upfront but may work better if you have certain bite problems.
Which attachment type usually feels more secure for eating and speaking, Locator or bar?
Bar systems often provide more stability when you bite into food. The bar extends past your ridge and prevents the front of your denture from moving when you eat things like apples.
Locator attachments work well for most eating and speaking if you have good ridge support. However, they rely more on your tissue for support than bar systems do.
Studies show that Locator attachments lead to higher patient satisfaction overall. The difference in security often comes down to your jaw shape and how much bone support you have.
How many implants are typically needed for a snap-in denture with Locator attachments versus a bar?
You can use a lower denture with just two Locator attachments if you have good ridge shape. Upper dentures may also work with two attachments if you have ideal bite alignment.
Bar systems usually need at least two implants but often use more for better distribution. The bar connects these implants together into one stable unit.
Your dentist will recommend the number based on your bone quality and jaw structure. More implants generally mean better stability regardless of which attachment system you choose.
What is the 3/2 rule for implant placement, and how does it affect snap-in denture stability?
The 3/2 rule means placing three implants in your upper jaw and two in your lower jaw for optimal denture support. This reflects the fact that upper jaws typically need more support than lower jaws.
Lower jaws have denser bone and better natural stability. Two well-placed implants can often provide enough retention for a lower snap-in denture.
Upper jaws have softer bone and less natural retention. Three implants help distribute forces better and prevent your denture from rocking when you bite.
How do cleaning and daily maintenance compare between Locator attachments and bar systems?
Locator attachments are easier to clean because each attachment sits separately on your gums. You can clean around each one with a soft brush and floss just like regular teeth.
Bar systems require more careful cleaning underneath the bar. Food and plaque can collect under the bar framework, so you need special floss threaders or interdental brushes.
Both systems require you to remove your denture daily for cleaning. Your natural gum tissue needs regular teeth cleaning regardless of which attachment type you have.
What are the most common repair or replacement needs with Locator inserts compared to bar clips?
Locator inserts typically need replacement every 12 to 18 months as they wear down from daily use. The nylon inserts lose their grip over time and become loose.
Bar clips also wear out but may last slightly longer in some cases. Traditional bar overdentures require regular bar adjustment visits and periodic bar maintenance or replacement.
Replacing Locator inserts is quick and inexpensive. Your dentist can swap them out in a single short visit without removing the implants themselves.